

How to Use Raspberry Pi as Router and Content Filter
If y'all take children at your domicile, yous might take felt the need to cake sure undesirable websites. Another common trouble expanse are social media websites – you might feel that children (and adults) waste too much time on Facebook, Twitter etc. and want to block them, or at least make them attainable only at certain times of the 24-hour interval.
To make this possible, nosotros demand arouter plus content filter – an appliance through which all our devices such equally laptops, smartphones, and tablets connect to the cyberspace. This appliance besides intercepts the websites that these devices access, and blocks them if they try to access a blacklisted website.
In that location are commercial, ready-to-utilize content filters bachelor in the market, but for united states DIY types, there is no fun in that. Thus, we will get our hands muddied, and set up a Raspberry Pi for the job. Nosotros chose the Raspberry Pi for this project because of its tiny size and negligible power consumption. Nonetheless, these instructions will work nearly unmodified with most any estimator running Debian Linux or a derivative (Ubuntu, Mint etc.).
Disclaimer : This guide assumes an intermediate level of feel with Linux, and a willingness to troubleshoot issues if and when they arise. Prior experience with command lines and firewalls is a bonus.
How information technology Works
Hardware
We will be using the Raspberry Pi 3 as a router cum content filter. For this, we will need 2 network interfaces on it – one to connect to the cyberspace, and the other to act as a WiFi hotspot for our other devices to connect to. The Raspberry Pi three has a congenital-in Ethernet jack and WiFi module. So in this scenario, we can use an Ethernet cablevision (eth0) to connect to the internet, while the WiFi module (wlan0) will act as a hotspot.
Of course, connecting to the internet using Ethernet isn't ever possible. In this case, you will demand a compatible USB WiFi dongle (wlan1) to connect to the internet, while the congenital-in WiFi module (wlan0) volition act as a hotspot. This is the configuration that we volition employ in this guide.
Do keep in mind that while a Raspberry Pi 3 is mostly adequate for a home setup with a few laptops and smartphones, it will non provide the performance needed for a big office setup. Await into more capable hardware if a lot of clients volition be connecting to your content filter.
Software
We will utilize the excellent E2guardian to intercept and filter our web requests. Since content filtering can accept a functioning impact (depending on the size of the blocklist), we will use Squid cache to get-go this functioning hitting.
Prerequisites
1. Raspberry Pi 3 with the latest version of Raspbian Bone installed, and access to the internet. If you are simply getting started with the Raspberry Pi, we recommend reading our guide on how to go started with Raspberry Pi iii.
ii. [Optional] USB WiFi Dongle – This is needed if, and merely if you cannot connect your Raspberry Pi 3 to the internet with an Ethernet cable. If y'all are planning to utilize WiFi for both connecting to the internet and as a hotspot, this is required.
3. Concrete Admission to the Raspberry Pi – Due to the nature this article, a single mistake in the firewall configuration can lock you out of your Pi if you apply information technology in headless mode. Therefore, it is recommended that y'all connect a monitor, keyboard and mouse while configuring information technology until everything is gear up.
Use Raspberry Pi as Router
ane. Connect your Pi to the internet using Ethernet (eth0). If y'all are using a USB WiFi dongle (probably wlan1) instead, connect that to the internet. Leave the congenital-in WiFi module (wlan0) as it is for at present.
2. Get the prerequisite software that nosotros demand:
sudo apt install iptables iptables-persistent hostapd dnsmasq squid3
3. We will set hostapd so that our Pi tin human action as a WiFi hotspot. For this, create a config file using your favorite text editor, for example sudo nano /etc/hostapd/hostapd.conf, and paste the content from our GitHub page.
Some lines that yous might want to modify according to taste are:
ssid=RaspberryPiAP
This line dictates what the name of the admission point volition exist. I chose RaspberryPiAP.
wpa_passphrase=beebom.com
This specifies the passphrase used to access the hotspot. I used beebom.com, but it is recommended to change it to a strong passphrase of your choice.
4. Next, nosotros will fix a DHCP server using dnsmasq. Edit the config file /etc/dnsmasq.conf, and add the following lines at the terminate:
[sourcecode]interface=lo,wlan0
no-dhcp-interface=lo
dhcp-range=192.168.8.20,192.168.8.254,255.255.255.0,12h[/sourcecode]
This makes the interface on wlan0 (the built-in WiFi module) manus out IP addresses to clients in the192.168.eight.20 to 192.168.8.254 range.
5. Set a static IP accost for the congenital-in WiFi module wlan0. Open the file /etc/network/interfaces. Information technology probably looks something similar this (accent mine):
[sourcecode]source-directory /etc/network/interfaces.d
auto lo
iface lo inet loopback
iface eth0 inet transmission
permit-hotplug wlan0
iface wlan0 inet transmission
wpa-conf /etc/wpa_supplicant/wpa_supplicant.conf
allow-hotplug wlan1
iface wlan1 inet manual
wpa-conf /etc/wpa_supplicant/wpa_supplicant.conf[/sourcecode]
Here, locate the lines in bold dealing with wlan0, and modify them, and then that the file looks similar the following:
[sourcecode]source-directory /etc/network/interfaces.d
auto lo
iface lo inet loopback
iface eth0 inet transmission
permit-hotplug wlan0
iface wlan0 inet static
hostapd /etc/hostapd/hostapd.conf
address 192.168.eight.1
netmask 255.255.255.0
allow-hotplug wlan1
iface wlan1 inet manual
wpa-conf /etc/wpa_supplicant/wpa_supplicant.conf[/sourcecode]
This sets upwards a static IP address 192.168.viii.1 on wlan0. Remember this accost, equally this is the address we will apply to communicate with our Raspberry Pi later on.
vi. Now fix IP forwarding. Edit the file /etc/sysctl.conf, and add the post-obit line to it:
internet.ipv4.ip_forward=1
7. Now we will configure network accost translation (NAT) in our firewall. To exercise this, enter the following 2 commands:
sudo iptables -t nat -A POSTROUTING -due south 192.168.eight.0/24 ! -d 192.168.8.0/24 -j MASQUERADE sudo iptables-save | sudo tee /etc/iptables/rules.v4
The kickoff command sets up NAT, while the 2nd command saves our present firewall configuration to a file called /etc/iptables/rules.v4. This makes sure that the configuration persists across reboots.
8. At this betoken, reboot your Raspberry Pi. This is to make certain that all the changes nosotros made in the configuration files are functional.
ix. After rebooting, you should be able to come across the newly created RaspberryPiAP hotspot (unless you changed the name in step three) on your other devices such as laptops and smartphones. You tin can connect to it using the password you specified, and access the internet.
This is all you need to practice to if you need a bones, low-powered router. If you want to set up a content filter as well, read on.
Set Upwards Content Filter Using E2guardian
E2guardian is non present in the default Raspbian repositories. To install it, go to the projection'south Github page, and download the file ending in armhf.deb. Now open Final, go to your Downloads folder (or wherever you chose to download the file), and install it:
cd ~/Downloads sudo dpkg -i ./e2guardian_*_jessie_armhf.deb
Yous will probably see a few errors about missing packages when you install E2guardian. To rectify this, allow the installation finish, and enter the post-obit command :
sudo apt-get install -f
Using Content Lists
At that place are several lists present in the /etc/e2guardian/lists directory. These files include bannedextensionlist, bannediplist, bannedphraselist, bannedsitelist, bannedurllist, exceptionlist, and more. These files are properly documented with comments. Have a look at them to familiarize yourself.
As an example, let'southward suppose you wish to block some popular social networks. Open the /etc/e2guardian/lists/bannedsitelist file, and under the Blanket SSL/CONNECT block (since these websites utilise https instead of apparently http), add the following lines:
facebook.com twitter.com reddit.com
Now reload the E2guardian service using the command sudo service e2guardian reload (you will have to run this command every time you modify the configuration files). Any clients using the content filter volition now be unable to access these websites. Even the mobile sites (eg. m.twitter.com) and defended smartphone apps will not work.
E2guardian also blocks porn by default. If you wish to allow it (hey, we aren't judging), open the /etc/e2guardian/lists/bannedphraselist file, and locate the following line:
.Include</etc/e2guardian/lists/phraselists/pornography/banned>
Comment it out by adding a hash (# symbol) to the front, so that information technology looks like this:
#.Include</etc/e2guardian/lists/phraselists/pornography/banned>
Again, reload the configuration with sudo service e2guardian reload, and you're washed.
Configuring Clients
Now that our proxy server is set, we tin motion on to configuring the clients. To use the content filter, all clients need to be continued to the Rapberry Pi's hotspot, and configured to utilise the proxy. Configuring a proxy is different beyond all operating systems and devices. All the same, nosotros will demonstrate how to set it up on Windows and Android, since these are more pop.
Windows
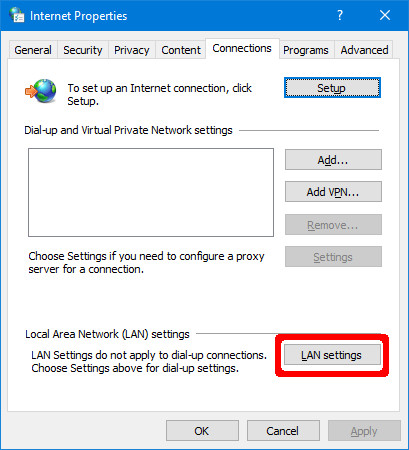
Go to Command Console > Network and Internet > Internet Options. In the window that opens up, navigate to the Connections tab, and click on LAN settings.
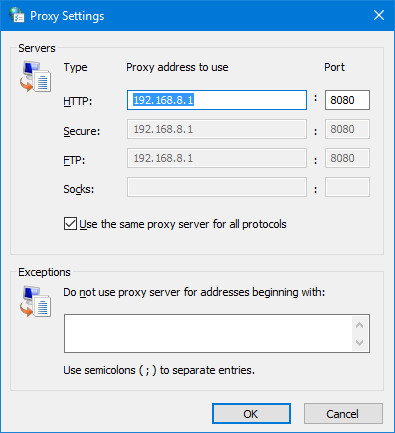
Here, click on Avant-garde, and enter 192.168.8.one as the proxy address, and 8080 every bit the port. Make sure that the Use the aforementioned proxy server for all protocols box is checked. Click OK.
That is all you need to do. About popular web browsers such as Google Chrome and Firefox will automatically pick upward the system proxy settings.
Android
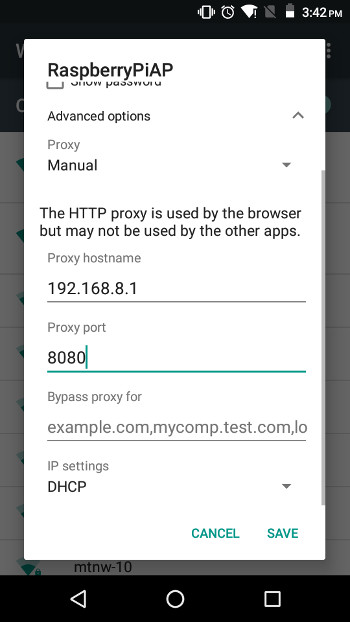
Get to Organization Settings > WiFi. Now tap and agree the Raspberry Pi hotspot, and select Modify network. Under Advanced options, set the Proxy option to Manual. Now, nether Proxy hostname, enter the IP address of the Pi 192.168.8.i. Under Proxy port, enter 8080, and tap on Save.
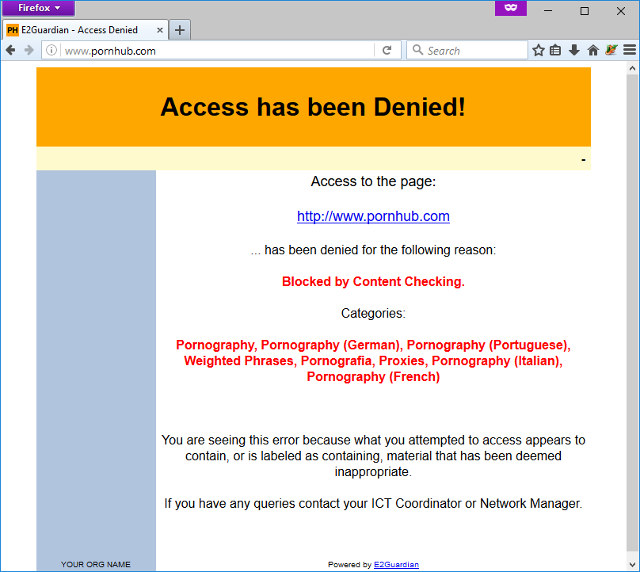
Y'all can at present exam the configuration of the proxy. Try going to a website in your blacklist – yous will meet an "Access Denied" folio like this:
Enforcing Proxy Usage
And so far, we are relying on clients playing squeamish and using the cyberspace through the content filter. Of course, this rarely happens in the real globe. So to enforce all clients to go through the proxy, run the following commands:
sudo iptables -A PREROUTING -t nat -p tcp --destination-port 80 -j REDIRECT --to-ports 8080 sudo iptables -A PREROUTING -t nat -p tcp --destination-port 443 -j REDIRECT --to-ports 8080 sudo iptables-save | sudo tee /etc/iptables/rules.v4
This will automatically redirect all http (port 80) and https (port 443) traffic on the raspberry Pi'southward hotspot to the content filter proxy. Now, without configuring proxy settings on your devices, they volition non be able to access secure https websites such as Facebook, Gmail, Twitter etc. at all. This makes certain that anyone who wishes to connect to your Pi hotspot has to go through the proxy.
This is all you need to know for bones usage of the content filter. If you wish to learn some advanced features, read on.
Advanced Usage Scenarios
Setting Up a Time-Based Filter
Permit's say you desire to block the websites we mentioned in the Using Content Lists department above, merely only at certain times of the day. I personally prefer to cake Reddit, Facebook and Twitter during piece of work hours (9am – 5pm) on weekdays because they are a productivity nightmare.
Open the /etc/e2guardian/lists/bannedsitelist file, and add the following line to it:
time: nine 0 17 0 01234
This line works as follows – the timer starts at nine (9 am) 0 (00 minutes), till 17 (5 pm in 24-hour format) 0 (00 minutes), from 0 (Monday) to iv (Friday).
Permit's take another example:
fourth dimension: ten 30 xx 45 024
This volition cake the configured sites from ten:30 am (10 30) till 8:45 pm (20 45) on Monday (0), Wednesday (2), and Friday (4).
Letting Certain IP Addresses Featherbed the Proxy
It is possible to permit certain IP addresses bypass the content filter. This tin can be ready by configuring the firewall. Yous might have noticed that in our dnsmasq.conf, we only fix the hotspot to assign IP addresses from 192.168.8.twenty to 192.168.8.254 to clients. That means addresses from 192.168.8.2 to 192.168.8.19 volition not be automatically assigned to any client (nosotros cannot use 192.168.8.ane because that is what our Raspberry Pi itself uses).
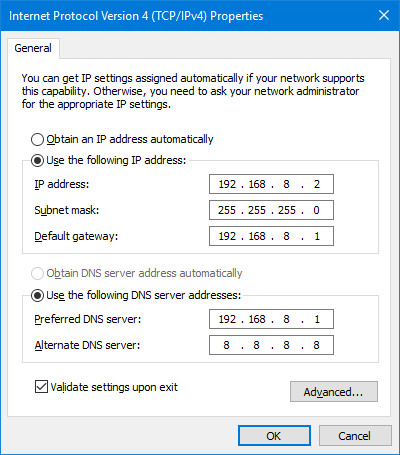
To do this, kickoff fix up a static IP on the device to which you want to give full access. For example, to fix up a static IP of 192.168.8.2 on a Windows machine, utilise these settings:
At present, on your Raspberry Pi, run the following commands.
sudo iptables -t nat -A PREROUTING -p tcp -s 192.168.viii.2 --destination-port fourscore -j RETURN sudo iptables -t nat -A PREROUTING -p tcp -southward 192.168.8.2 --destination-port 443 -j Render
Now, disable the usage of proxy on your device, and try to open up a banned website. Y'all should be able to open it. If there are more IP addresses that you want to add together to the whitelist, run the above ii commands again, but supercede the IP address with the one you want. One time you are satisfied with the whitelist, run the following command to save your firewall config:
sudo iptables-save | sudo tee /etc/iptables/rules.v4
1 of import thing to keep in mind is that you should not let anyone know the whitelisted IP addresses. Otherwise, they can just set their device to that IP accost to bypass the proxy.
Security Concerns
Since your Raspberry Pi will be the entry and exit point for all your communications, it is important to secure it. Here are some tips on how to meliorate security. Go on in mind that these are only basic pointers and not a comprehensive list of security pitfalls. The amount of security will depend on the nature of your network (home, small-scale office etc.) and how mischievous the users are.
Disable Unneeded Services
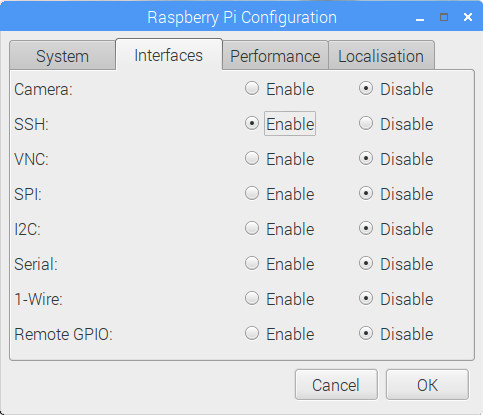
Since this is a router, it is best to only run the services that we crave. More services running means more vulnerabilities that can potentially be exploited. Definitely do not use this system as a regular desktop.
Become to Menu > Preferences > Raspberry Pi Configuration. In the Interfaces tab, disable all services that you do non require.
Modify the Default Password
A fresh Raspbian installation comes with the default password 'raspberry' for the default user 'pi'. Information technology is recommended to change this to a more secure password. To change it, open up a last run this command:
passwd
Remove the Monitor and Other Peripherals
Since all that will run on this Pi is the software required to use information technology equally a router and web filter, we do not need a monitor or other peripherals such every bit a mouse and keyboard attached to it. If y'all exercise need to change settings and such, you tin always use SSH, or attach a monitor and keyboard as needed.
Plow off Auto Login
Raspbian is set to automatically log in with the 'pi' user credentials without prompting for password. This might be ok for a general purpose family desktop, just dangerous for a router. To disable this, on the Raspbian desktop, become to Carte du jour > Preferences > Raspberry Pi Configuration. In the Organisation tab, in front of the Automobile login heading, uncheck the Login as user 'pi' checkbox.
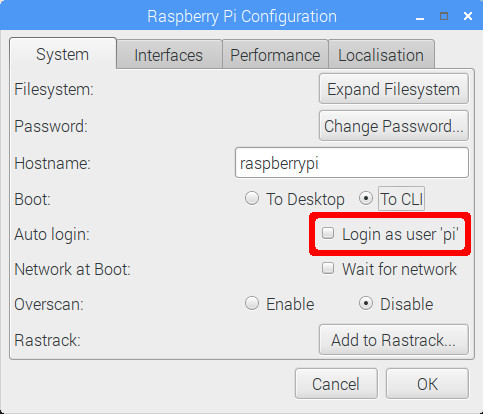
In the same dialog box, it is also advisable to set the Boot setting to To CLI. This will save resources since we do not need a GUI on a router. If yous exercise want to utilise the desktop for whatever reason, log in with your username, and run the startx control to turn on the graphical interface.
Troubleshooting Common Bug
Interfaces Keep Getting Renamed
This is very common if y'all are using two wireless interfaces on your Pi. If y'all are using Ethernet to connect your Pi to the internet, you can safely ignore this department. The problem is that both the wireless interfaces (wlan0 and wlan1) sometimes bandy names later a reboot. That is, the congenital-in WiFi module wlan0 gets renamed to wlan1, and vice versa. This is of course a large trouble since nosotros rely on them having a consistent proper name for our configuration files. Here is how to make information technology consistent across reboots:
i. Discover out the MAC address of your interfaces. Run the control ifconfig | grep HWaddr on your Raspberry Pi. You will run across an output like the following:

Note down the text to the right of the discussion 'HWaddr' in the wlan0 and wlan1 section. You can safely ignore the eth0 section. These are the MAC addresses of your wireless interfaces.
If you are not sure which MAC accost belongs to which interface, simply unplug the USB WiFi dongle, and run the command again. The wlan interface that comes up now is your congenital-in WiFi interface, while the other one is USB.
2. Create a new file /etc/udev/rules.d/10-network.rules using your favorite text editor. For example :
sudo nano /etc/udev/rules.d/10-network.rules
3. Enter the following text in this file. Replace the xx:xx:xx:twenty etc. with the appropriate MAC address:
[sourcecode]# Set the congenital-in WiFi module as wlan0. Supercede the 20:xx:twenty etc. with the
# congenital-in module'due south MAC address
SUBSYSTEM=="net", Activity=="add together", ATTR{address}=="xx:xx:twenty:xx:xx:xx", NAME="wlan0"
# Ready the USB WiFi dongle as wlan1. Replace the yy:yy:yy etc. with the
# USB dongle's MAC address
SUBSYSTEM=="net", ACTION=="add", ATTR{accost}=="yy:yy:yy:yy:yy:yy", Name="wlan1"[/sourcecode]
Make sure that the born WiFi interface's MAC accost corresponds to wlan0, and the USB WiFi to wlan1 since that is the convention we are following in this guide.
iv. Reboot your Raspberry Pi. Your interfaces will start with the right name now.
Resetting Firewall Configuration
Some other common problem is a desperately configured firewall. Depending on your network configuration, it might have several tries before you get the firewall right. If at whatever signal you think that you might have messed up the firewall configuration, run the following commands to beginning from scratch:
sudo iptables --flush sudo iptables --table nat --flush sudo iptables --delete-chain sudo iptables --table nat --delete-chain
This will delete all firewall configuration. You can at present commencement configuring the firewall from scratch. One time you are satisfied, run the command sudo iptables-save | sudo tee /etc/iptables/rules.v4 to brand the configuration permanent.
SEE As well: How To Run Commands on Raspberry Pi by Electronic mail
Use Your Raspberry Pi equally Router and Content Filter
That is all on turning your Raspberry Pi into a stiff router plus content filter proxy. Yous tin become the verbal configuration files we used for our setup on our GitHub page. Do let us know how it works out for yous. If something does non work as expected, or a step feels as well disruptive, feel free to ask usa a question in the comments department beneath.

Source: https://beebom.com/how-to-use-raspberry-pi-as-router-and-content-filter/
Posted by: woolleyuple1987.blogspot.com
0 Response to "How to Use Raspberry Pi as Router and Content Filter"
Post a Comment